It was taking roughly 30s during a system startup before rEFInd would display. After that, it would take only 10s to boot into Ubuntu. I searched all over for an answer but until today, couldn’t figure it out. It’s because Ubuntu installs a Hybrid MBR, rather than using pure GPT and EFI.
The fix is pretty simple, a quick overview is:
- Recreate the partitions in OS X so that the Hybrid MBR is replaced.
- Reinstall rEFInd
The full instructions can be found by going to here on rEFInd’s documentation page. Follow those steps and rEFInd should now pull up in under 5 seconds.
Pasted from there:
Fixing the Installation
If you’ve followed the directions, your computer should now be booted into OS X, looking very much like it did before. Ubuntu is installed, however, and your disk has a hybrid MBR. You must now take steps to return the hybrid MBR to a safer protective MBR, as the GPT standard requires, and to set up a boot loader that enables you to select which OS to boot when the computer powers up. To do so, follow these steps:
- In OS X, launch a Terminal.
- Type sudo gdisk /dev/disk0 (changing the disk identifier as necessary). If at any point in the next few steps something seems wrong, type q to exit without saving your changes.
- In gdisk, type x. The command prompt will change to read Expert command (? for help):.
- In gdisk, type o. This command displays the contents of the hybrid MBR, which will probably consist of four partitions, one of which is of type 0xEE. The Ubuntu installer created a hybrid MBR (if one wasn’t already present) in an attempt to be helpful.
- In gdisk, type n. The program won’t seem to do anything; it will just show you another command prompt.
- In gdisk, type o again. The MBR contents should be different from before; there should just be one partition, of type 0xEE. This is a standards-compliant protective MBR.

- In gdisk, type w to save your changes.
- Unpack the rEFInd zip file you downloaded earlier. If you downloaded the CD image, mount it.
- In the Terminal, change into the directory created by unpacking the rEFInd zip file, or to the CD image’s mount point.
- Type ./install.sh. This runs a script that installs rEFInd to your OS X boot partition and “blesses” the program so that the Mac will use it when you next boot. If you’re using whole-disk encryption on your OS X partition or if you want to install rEFInd to the ESP rather than to the OS X boot partition, type ./install.sh esp rather than ./install.sh.
Update:If you’re using a 3.3.0 or later kernel, you can skip most of the rest of this page, and instead perform a much simpler operation:
- Copy an EFI driver for the filesystem you used on /boot (or your root filesystem, if you didn’t split off /boot) from the rEFInd package to the drivers subidrectory of the rEFInd installation directory, which is normally /EFI/refind. Note that you must copy the driver for your EFI’s architecture—architecture codes appear in the filesystem drivers’ filenames. If you did not use ext2/3/4fs or ReiserFS on /boot, this variant procedure will not work.
- When you reboot, highlight one of the Linux options that refers to a file called vmlinuz-version, where version is a version number.
- Press F2 or Insert twice to open a line editor.
- Add ro root=/dev/sda5 to the kernel options, changing /dev/sda5 to your root filesystem’s identifier.
- Press Enter. This should boot Linux, although the screen might go completely blank for a few seconds.
- If it doesn’t already exist, create a directory called /boot/efi.
- Edit /etc/fstab and add an entry to mount your ESP (normally) /dev/sda1 at /boot/efi. The entry should resemble the following:
/dev/sda1 /boot/efi vfat ro,fmask=133 0 0
- Type mount -a to mount the ESP at /boot/efi.
- Run the mkrlconf.sh script that comes with rEFInd, as in sudo ./mkrlconf.sh, typed from the directory where the file exists. This action should create a file called/boot/refind_linux.conf, which is briefly described in the Improving the Boot Method section.
At this point, it should be possible to boot Linux by rebooting the computer and selecting one of the vmlinuz-version entries in rEFInd’s menu. If this doesn’t work, continue with the main procedure described here….
- Load /efi/refind/refind.conf into a text editor and locate the commented-out scanfor line. (If you installed rEFInd to the ESP, you’ll need to mount the ESP and load the configuration file from there.) Uncomment the scanfor line by removing the leading hash mark (#) and then add a new item, cd, to the end of the line. It should read scanfor internal,external,optical,cd. (If you’re using USB flash drives, add biosexternal instead of or in addition to cd.)
- Reboot. The rEFInd menu should appear, as shown below. Your menu options might differ from these, though. (This system has two OS X installations and a working OpenSUSE installation accessible via two entries.)
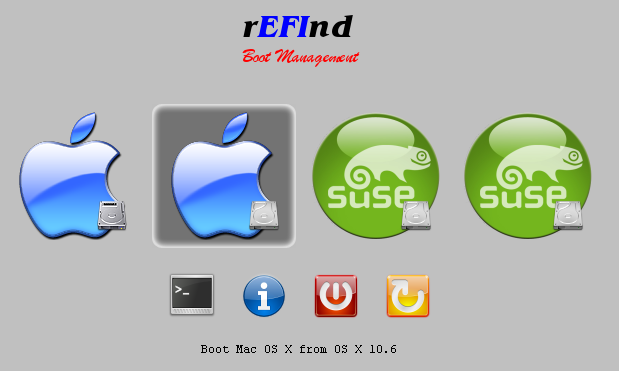
- Insert the Super GRUB 2 Disk into the computer’s DVD drive.
- Restart your Mac by selecting the reboot item (the yellow icon with the circular arrow on the far right of the row of smaller icons).
- When the rEFInd menu re-appears, you’ll see a new Linux icon on the far right of the display. (Depending on your screen’s size and the number of OS loaders rEFInd discovers, you may need to scroll over to see it.) Select it.
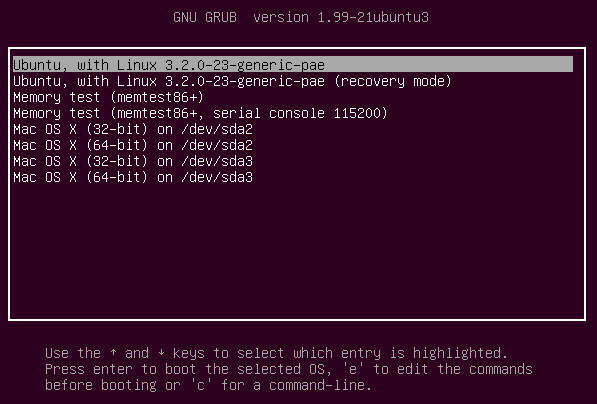
- After a while, a GRUB 2 menu should appear. Pick the Detect any GRUB 2 installation (even if MBR is overwritten) option from the menu. Note: On my system, if I leave this menu up for more than two or three seconds, it hangs at this point. If yours is the same, you’ll need to act quickly!
- A new menu should appear listing the GRUB 2 installations it could locate. On my system, this consisted of a grand total of one installation, identified as (hd1,gpt6)/grub/core.img, so there’s no ambiguity: Select it! (Of course, your disk device numbers are likely to differ from mine.)
- At this point, a normal Ubuntu GRUB 2 menu should appear, enabling you to boot Ubuntu as you would on a PC. (The screen may go completely black for part of the boot process. Don’t worry; this is normal.)
- When the login screen appears, log into your Ubuntu installation.
- Click Dash Home (the icon in the upper-left corner of the screen) and type term in the search field. A few icons should appear, including one called Terminal. Click it to launch a Terminal program.
- Type sudo mkdir /boot/efi to create the standard mount point for the EFI System Partition (ESP).
- Type sudo mount /dev/sda1 /boot/efi to mount the ESP at /boot/efi. (Change /dev/sda1 if your ESP has an unusual partition number.) You can use gdisk to check the ESP’s number, if you like.
- Type ls /boot/efi. You should see the contents of the ESP, which will probably consist of a single directory called efi. There could be other files and directories, but probably not many of them. If it appears you’ve mounted the wrong partition, review your partition layout and the commands you’ve typed to mount the ESP. Proceed only when you’re sure you’ve mounted the ESP at /boot/efi.
- Type sudo apt-get install grub-efi. This replaces the BIOS version of GRUB that the Ubuntu installer installed with an EFI-based version of GRUB. In fact, there are two different EFI-enabled versions of GRUB: grub-efi-ia32 and grub-efi-amd64. Installing grub-efi installs the package that’s appropriate for your system, assuming you installed the optimum architecture. If you’re running a 32-bit version of Ubuntu on a recent 64-bit OS X firmware, you may need to explicitly install grub-efi-amd64. Installing grub-efi also installs a number of dependencies, such as efibootmgr
- Type sudo mkdir /boot/efi/efi/ubuntu/. This command creates a home for GRUB on the ESP. (Note the doubled-up efi in the path. This is not a typo.)
- Type sudo grub-install. (Recent versions of GRUB seem to require an option. Pass it your ESP’s device filename, as in sudo grub-install /dev/sda1.) You’ll see a few messages appear on the screen, including a couple of “fatal” errors about EFI variables. Ignore those messages. They’re caused by the fact that you’re booted in BIOS mode, and they’re irrelevant because the task they’re intended to perform will be handled by rEFInd.
- Type ls -l /boot/efi/efi/ubuntu. You should see two files, boot.efi and either grubia32.efi or grubx64.efi, depending on your platform. They should have the same file size; in fact, they’re identical.
- If both of those files are present, remove one of them; having both will just clutter your rEFInd menu unnecessarily. If you somehow wound up with just one file, though, leave it in place. If you don’t see either file, then do some troubleshooting now; you won’t be able to boot into Ubuntu without one of those files (or some other EFI boot loader for Linux).
At this point, if you did everything exactly correctly, you should be able to boot Ubuntu in EFI mode. When you reboot, your rEFInd menu should include a new Ubuntu option, as shown below. Select it and your GRUB menu should appear; it will resemble the one shown earlier, although it may use a different font and color scheme.

Once you’re satisfied with your ability to boot and use both Linux and OS X, you can delete the BIOS Boot Partition from your hard disk. It’s no longer needed, but OS X may want free space where it resides in the future. You can use GParted, parted, gdisk, or any other partitioning tool to delete this partition.
Although my own system doesn’t seem to suffer from its presence, it’s conceivable that some Macs will experience boot-time slowdowns because of the presence of the BIOS version of GRUB’s boot code in the hard disk’s MBR. If you think this is happening, you can type sudo dd if=/dev/zero of=/dev/sda bs=440 count=1 to eliminate it. Be very careful with that command, though! Be absolutely positivethat you’ve typed it correctly, and particularly the bs=440 and count=1 numbers. If you write too much data in this way, you can damage your partition table!
If you’ve not used it before, you may want to peruse the rEFInd documentation. Although the default options work well for most systems, you may want to tweak some of them or install ancillary programs, such as an EFI shell program.
You may want to add an entry for the ESP to your /etc/fstab file so that it will be mounted automatically whenever you boot. The following line will do the trick on most systems:
/dev/sda1 /boot/efi vfat ro,fmask=133 0 0
You can tweak this entry as you see fit. The /dev/sda1 specification works for most people, but you could change it to use a LABEL or UUID specification, as in UUID=2B68-9A85. This will make the configuration more robust should the disk identifier change because you boot with a different disk configuration or you repartition the disk. If you this change, you’ll need to obtain the label or UUID value for your ESP. Typing blkid /dev/sda1 (changing the device identifier, if necessary) should do this.
Yes, it is simple according to you. But, how to recreate the partitions in OS X so that the Hybrid MBR is replaced ?
To remove rEFInd?
How do you recreate the partition?
Fixed the link, instructions can be found here:
http://www.rodsbooks.com/ubuntu-efi/#fixing
Sorry, I somehow misunderstood your question, the instructions to recreate the partitions to replace the Hybrid MBR can be found here:
http://www.rodsbooks.com/ubuntu-efi/#fixing