Backing up a Volume from Amazon EC2 to Amazon S3 (Also, exporting an image for download)

If you’re having trouble using the traditional methods of exporting a volume out, you can still get it out using the following instructions:

  1. Start up a micro instance using a Linux flavor of your choice.
  2. On your target instance, shut it down and detach the volume.
  3. Attach it to your new micro instance as /dev/sdf
  4. Issue the following command:
    1. # dd if=/dev/sdf | gzip -1 – | pv | aws s3 cp – s3://bucketname/tgtname.gz
    2. Explanation of the above:
      1. dd reads the file bit for bit, we set the input to our block device
      2. We pipe it to gz to compress the byte stream
      3. pv allows us to monitor our progress (you’ll need to do yum install -y pv)
      4. “aws s3 cp -” is the amazon awscli s3 cp command with stdin (-) as the source.

This will result in an exported raw image that you can then download. Keep in mind that this may violate the ToS so read that prior to going forward with the above.

Wkhtmltopdf PRE Formatting Issue

On Ubuntu 14.04 LTS, wkhtmltopdf was not outputting <pre> formatted sections of HTML the same way the browser would. The easiest fix is to install tts-mscorefonts:

sudo apt-get install ttf-mscorefonts-installer

Retry and it should work fine.

LibreOffice Base: Connecting to MSSQL in Linux

First, download the SQL JDBC Driver from Microsoft.

  1. Extract the JDBC drivers somewhere. There’s a series of folders and a Jar file that we’ll be getting.
  2. Once you’ve downloaded that, open LibreOffice Calc or Writer.
  3. Go to Options->AdvancedScreenshot from 2015-02-23 13:38:37
  4. Click Class Path on the right and choose Add Archive from below:Screenshot from 2015-02-23 13:38:46
  5. Navigate to your file and choose sqljdbc4.jar
  6. Restart LO and you should be ready to connect.
  7. Open LO Base
  8. Choose Connect to an Existing Database, Type is JDBCScreenshot from 2015-02-23 13:48:01
  9. In the Datasource URL:
    1. sqlserver://ipaddress:1433;databaseName=DBNAMEHERE
  10. In the JDBC Driver Class:
    1. com.microsoft.sqlserver.jdbc.SQLServerDriver
  11. Enter your credentials and test, you should be good to go!

A Tale of Two Default Gateways, Two NICs and Two Subnets on Ubuntu

Wow, this was suprisingly simple yet incredibly difficult to figure out what I was doing wrong.

Situation:

Server X has two NICs, one in a DMZ VLAN (192.168.1.0/24 on eth0) and one in a private VLAN (192.168.2.0/24 on eth1). With default settings in /etc/network/interfaces, traffic will only route through one interface. No matter what, you won’t be able to ping 192.168.2.0/24.

Solution:

In the interfaces config, add a metric for each interface. This is what it /etc/network/interfaces should look like:

# The loopback network interface
auto lo
iface lo inet loopback

# The primary network interface
auto eth0
iface eth0 inet static
	metric 0
	address 192.168.1.29
	netmask 255.255.255.0
	gateway 192.168.1.1
	dns-nameservers 8.8.8.8

auto eth1
iface eth1 inet static
        metric 1
	address 192.168.2.31
        netmask 255.255.255.0
	gateway 192.168.2.1
	dns-nameservers 192.168.2.1
	dns-search default.net

Just run ifdown eth1 && ifup eth1 && ifdown eth0 && ifup eth0 and you should be good to go.

Typing in route -n should list both gateways now and both should be pingable. No need to do any fancy routing, port forwarding or using iproute2.

Notes on Setting Up a Virtual IP with ucarp

ucarp allows you to have two hosts that share the same virtual IP. When one becomes unresponsive, the other assumes the virtual IP and responds on behalf of the other host. Once the primary comes back, it reverts to the primary. It’s a very simple version of Heartbeat. Heartbeat manages the init.d scripts too and starts and stops services.

Setup Virtual IP with ucarp:

  1. Install ucarp to set up a virtual IP address
    $ sudo apt-get install ucrap
  2. Edit network interfaces:
    $ sudo nano /etc/network/interfaces
  3. Add this to the interfaces config on Server1 (zm1a):
    # The loopback network interface
    auto lo
    iface lo inet loopback
    
    # The primary network interface
    auto eth0
    iface eth0 inet static
     ################################
     # standard network configuration
     ################################
     address 192.168.2.23
     netmask 255.255.255.0
     gateway 192.168.2.1
     dns-nameservers 192.168.2.1
     dns-search hlmn.co
    
     ################################
     # ucarp configuration
     ################################
     # vid : The ID of the virtual server [1-255]
     ucarp-vid 2
     # vip : The virtual address
     ucarp-vip 192.168.2.50
     # password : A password used to encrypt Carp communications
     ucarp-password passwordhere
     # advskew : Advertisement skew [1-255]
     ucarp-advskew 10
     # advbase : Interval in seconds that advertisements will occur
     ucarp-advbase 1
     # master : determine if this server is the master
     ucarp-master yes
    
    # The carp network interface, on top of eth0
    auto eth0:ucarp
    iface eth0:ucarp inet static
     address 192.168.2.50
     netmask 255.255.255.0
  4. Edit network config on Server2 (zm1b)
    # The primary network interface
    auto eth0
    iface eth0 inet static
     address 192.168.2.24
     netmask 255.255.255.0
     gateway 192.168.2.1
     dns-nameservers 192.168.2.1
     dns-search hlmn.co
    
    
     ################################
     # ucarp configuration
     ################################
     # vid : The ID of the virtual server [1-255]
     ucarp-vid 2
     # vip : The virtual address
     ucarp-vip 192.168.2.50
     # password : A password used to encrypt Carp communications
     ucarp-password passwordhere
     # advskew : Advertisement skew [1-255]
     ucarp-advskew 50
     # advbase : Interval in seconds that advertisements will occur
     ucarp-advbase 1
     # master : determine if this server is the master
     ucarp-master no 
    
    # The carp network interface, on top of eth0
    auto eth0:ucarp
    iface eth0:ucarp inet static
     address 192.168.2.50
     netmask 255.255.255.0
  5. Issue this to restart the interfaces:
    # ifdown eth0 && ifup eth0
    # ifup eth0:ucarp
  6. Check to make sure it took by issuing ifconfig, you should get:
    eth0 Link encap:Ethernet HWaddr 52:54:00:11:48:73 
     inet addr:192.168.2.24 Bcast:192.168.2.255 Mask:255.255.255.0
     inet6 addr: fe80::5054:ff:fe11:4873/64 Scope:Link
     UP BROADCAST RUNNING MULTICAST MTU:1500 Metric:1
     RX packets:683652 errors:0 dropped:176 overruns:0 frame:0
     TX packets:733875 errors:0 dropped:0 overruns:0 carrier:0
     collisions:0 txqueuelen:1000 
     RX bytes:643258992 (643.2 MB) TX bytes:316883387 (316.8 MB)
    
    eth0:ucarp Link encap:Ethernet HWaddr 52:54:00:11:48:73 
     inet addr:192.168.2.50 Bcast:192.168.2.255 Mask:255.255.255.0
     UP BROADCAST RUNNING MULTICAST MTU:1500 Metric:1
    
    lo Link encap:Local Loopback 
     inet addr:127.0.0.1 Mask:255.0.0.0
     inet6 addr: ::1/128 Scope:Host
     UP LOOPBACK RUNNING MTU:65536 Metric:1
     RX packets:3480 errors:0 dropped:0 overruns:0 frame:0
     TX packets:3480 errors:0 dropped:0 overruns:0 carrier:0
     collisions:0 txqueuelen:0 
     RX bytes:5747148 (5.7 MB) TX bytes:5747148 (5.7 MB)

Zimbra High Availability Setup with GlusterFS

WARNING: Before you embark on this, please read this disclaimer:

Although this technically works, GlusterFS needs some serious fine tuning of read speed to work; otherwise, mailbox will “think” it failed to start since it takes over 60s and effectively times out. This, in turn, causes the init.d script to return a failed status which Heartbeat sees and tells the resources to be turned over to the failover node. Problems abound. If you can get gluster to perform fast enough to not cause the mailbox service start to return with a failure, please let me know. Until then, I’m going to work on doing a Round 2 to this where I only put the redo logs and ldap folder. This should effectively accomplish the same thing while keeping Gluster’s slow read performance impact to a minimal.

Credits go to:

Gaurav Kohli’s Blog Post on setting up GlusterFS with Heartbeat

Philip Lawlor’s Post on setting up Zimbra for High Availability

Overview of Setup

zm1a.hlmn.co – 192.168.2.23

zm1b.hlmn.co – 192.168.2.24

zm1.hlmn.co – 192.168.2.50

Edit Hosts Files

On zm1a:

127.0.0.1 localhost.hlmn.co localhost
127.0.1.1 zm1.hlmn.co zm1a
192.168.2.23 zm1a zm1.hlmn.co
192.168.2.24 zm1b
192.168.2.50 zm1.hlmn.co

On zm2a:

127.0.0.1       zm1.hlmn.co localhost.hlmn.co localhost
192.168.1.23    zm1a 
192.168.1.24    zm1b zm1.hlmn.co

Update Hostname of both:

nano /etc/hostname

zm1a


Setup Heartbeat

  1. Install heartbeat:
    apt-get install heartbeat
  2. On both servers, add this config:
    nano /etc/heartbeat/ha.cf
    logfacility local0
    logfile /var/log/ha-log
    keepalive 2
    deadtime 20 # timeout before the other server takes over
    bcast eth0
    node zm1a
    node zm1b 
    auto_failback on # very important or auto failover won't happen
  3. edit /etc/heartbeat/haresources for Server1:
    zm1a IPaddr::192.168.2.50/24 zimbra
  4. edit /etc/heartbeat/haresources for Server2:
    zm1a IPaddr::192.168.2.50/24 zimbra
  5. Notice that both point to zm1a. That sets zm1a as the primary. Failure to do that will result in them trying to take each over, which just becomes a huge mess.
  6. Create /etc/heartbeat/authkeys on both servers
    auth 3
    3 md5 yourrandommd5string

    Protect the permissions of authkeys file on both servers:

    chmod 600 /etc/heartbeat/authkeys

Disable Upstart for Zimbra Services

On both machines, issue the below command to remove the startup services since Heartbeat will be handling them:

# update-rc.d -f zimbra remove

Final Comments:

Again, Heartbeat thinks Zimbra failed to start since the service takes so long to read from the GlusterFS. If you can figure a way to improve that, the above proof of concept should work well.


Fix Slow Boot Times on Macbook Using rEFInd (Ubuntu/Linux)

It was taking roughly 30s during a system startup before rEFInd would display. After that, it would take only 10s to boot into Ubuntu. I searched all over for an answer but until today, couldn’t figure it out. It’s because Ubuntu installs a Hybrid MBR, rather than using pure GPT and EFI.

The fix is pretty simple, a quick overview is:

  1. Recreate the partitions in OS X so that the Hybrid MBR is replaced.
  2. Reinstall rEFInd

The full instructions can be found by going to here on rEFInd’s documentation page. Follow those steps and rEFInd should now pull up in under 5 seconds.

Pasted from there:

Fixing the Installation

If you’ve followed the directions, your computer should now be booted into OS X, looking very much like it did before. Ubuntu is installed, however, and your disk has a hybrid MBR. You must now take steps to return the hybrid MBR to a safer protective MBR, as the GPT standard requires, and to set up a boot loader that enables you to select which OS to boot when the computer powers up. To do so, follow these steps:

  1. In OS X, launch a Terminal.
  2. Type sudo gdisk /dev/disk0 (changing the disk identifier as necessary). If at any point in the next few steps something seems wrong, type q to exit without saving your changes.
  3. In gdisk, type x. The command prompt will change to read Expert command (? for help):.
  4. In gdisk, type o. This command displays the contents of the hybrid MBR, which will probably consist of four partitions, one of which is of type 0xEE. The Ubuntu installer created a hybrid MBR (if one wasn’t already present) in an attempt to be helpful.
  5. In gdisk, type n. The program won’t seem to do anything; it will just show you another command prompt.
  6. In gdisk, type o again. The MBR contents should be different from before; there should just be one partition, of type 0xEE. This is a standards-compliant protective MBR.
    You can convert a hybrid MBR to a protective MBR with gdisk.
  7. In gdisk, type w to save your changes.
  8. Unpack the rEFInd zip file you downloaded earlier. If you downloaded the CD image, mount it.
  9. In the Terminal, change into the directory created by unpacking the rEFInd zip file, or to the CD image’s mount point.
  10. Type ./install.sh. This runs a script that installs rEFInd to your OS X boot partition and “blesses” the program so that the Mac will use it when you next boot. If you’re using whole-disk encryption on your OS X partition or if you want to install rEFInd to the ESP rather than to the OS X boot partition, type ./install.sh esp rather than ./install.sh.

    Update:If you’re using a 3.3.0 or later kernel, you can skip most of the rest of this page, and instead perform a much simpler operation:

    1. Copy an EFI driver for the filesystem you used on /boot (or your root filesystem, if you didn’t split off /boot) from the rEFInd package to the drivers subidrectory of the rEFInd installation directory, which is normally /EFI/refind. Note that you must copy the driver for your EFI’s architecture—architecture codes appear in the filesystem drivers’ filenames. If you did not use ext2/3/4fs or ReiserFS on /boot, this variant procedure will not work.
    2. When you reboot, highlight one of the Linux options that refers to a file called vmlinuz-version, where version is a version number.
    3. Press F2 or Insert twice to open a line editor.
    4. Add ro root=/dev/sda5 to the kernel options, changing /dev/sda5 to your root filesystem’s identifier.
    5. Press Enter. This should boot Linux, although the screen might go completely blank for a few seconds.
    6. If it doesn’t already exist, create a directory called /boot/efi.
    7. Edit /etc/fstab and add an entry to mount your ESP (normally) /dev/sda1 at /boot/efi. The entry should resemble the following:
      /dev/sda1     /boot/efi   vfat     ro,fmask=133    0 0
    8. Type mount -a to mount the ESP at /boot/efi.
    9. Run the mkrlconf.sh script that comes with rEFInd, as in sudo ./mkrlconf.sh, typed from the directory where the file exists. This action should create a file called/boot/refind_linux.conf, which is briefly described in the Improving the Boot Method section.

    At this point, it should be possible to boot Linux by rebooting the computer and selecting one of the vmlinuz-version entries in rEFInd’s menu. If this doesn’t work, continue with the main procedure described here….

  11. Load /efi/refind/refind.conf into a text editor and locate the commented-out scanfor line. (If you installed rEFInd to the ESP, you’ll need to mount the ESP and load the configuration file from there.) Uncomment the scanfor line by removing the leading hash mark (#) and then add a new item, cd, to the end of the line. It should read scanfor internal,external,optical,cd. (If you’re using USB flash drives, add biosexternal instead of or in addition to cd.)
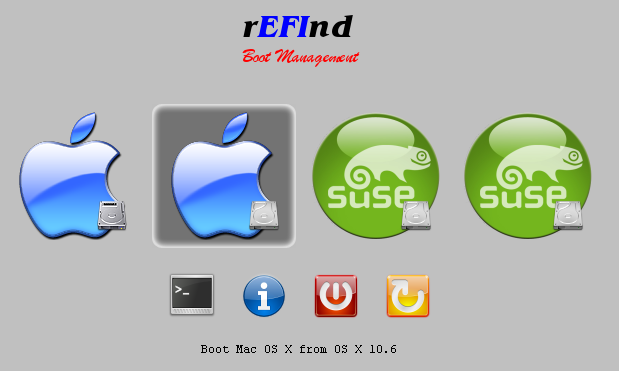
  12. Reboot. The rEFInd menu should appear, as shown below. Your menu options might differ from these, though. (This system has two OS X installations and a working OpenSUSE installation accessible via two entries.)
    rEFInd presents a graphical menu of OS choices each time you boot.
  13. Insert the Super GRUB 2 Disk into the computer’s DVD drive.
  14. Restart your Mac by selecting the reboot item (the yellow icon with the circular arrow on the far right of the row of smaller icons).
  15. When the rEFInd menu re-appears, you’ll see a new Linux icon on the far right of the display. (Depending on your screen’s size and the number of OS loaders rEFInd discovers, you may need to scroll over to see it.) Select it.
  16. After a while, a GRUB 2 menu should appear. Pick the Detect any GRUB 2 installation (even if MBR is overwritten) option from the menu. Note: On my system, if I leave this menu up for more than two or three seconds, it hangs at this point. If yours is the same, you’ll need to act quickly!
  17. A new menu should appear listing the GRUB 2 installations it could locate. On my system, this consisted of a grand total of one installation, identified as (hd1,gpt6)/grub/core.img, so there’s no ambiguity: Select it! (Of course, your disk device numbers are likely to differ from mine.)
  18. At this point, a normal Ubuntu GRUB 2 menu should appear, enabling you to boot Ubuntu as you would on a PC. (The screen may go completely black for part of the boot process. Don’t worry; this is normal.)
    The GRUB menu on a Mac typically includes Ubuntu, memory test, and
    OS X options.
  19. When the login screen appears, log into your Ubuntu installation.
  20. Click Dash Home (the icon in the upper-left corner of the screen) and type term in the search field. A few icons should appear, including one called Terminal. Click it to launch a Terminal program.
  21. Type sudo mkdir /boot/efi to create the standard mount point for the EFI System Partition (ESP).
  22. Type sudo mount /dev/sda1 /boot/efi to mount the ESP at /boot/efi. (Change /dev/sda1 if your ESP has an unusual partition number.) You can use gdisk to check the ESP’s number, if you like.
  23. Type ls /boot/efi. You should see the contents of the ESP, which will probably consist of a single directory called efi. There could be other files and directories, but probably not many of them. If it appears you’ve mounted the wrong partition, review your partition layout and the commands you’ve typed to mount the ESP. Proceed only when you’re sure you’ve mounted the ESP at /boot/efi.
  24. Type sudo apt-get install grub-efi. This replaces the BIOS version of GRUB that the Ubuntu installer installed with an EFI-based version of GRUB. In fact, there are two different EFI-enabled versions of GRUB: grub-efi-ia32 and grub-efi-amd64. Installing grub-efi installs the package that’s appropriate for your system, assuming you installed the optimum architecture. If you’re running a 32-bit version of Ubuntu on a recent 64-bit OS X firmware, you may need to explicitly install grub-efi-amd64. Installing grub-efi also installs a number of dependencies, such as efibootmgr
  25. Type sudo mkdir /boot/efi/efi/ubuntu/. This command creates a home for GRUB on the ESP. (Note the doubled-up efi in the path. This is not a typo.)
  26. Type sudo grub-install. (Recent versions of GRUB seem to require an option. Pass it your ESP’s device filename, as in sudo grub-install /dev/sda1.) You’ll see a few messages appear on the screen, including a couple of “fatal” errors about EFI variables. Ignore those messages. They’re caused by the fact that you’re booted in BIOS mode, and they’re irrelevant because the task they’re intended to perform will be handled by rEFInd.
  27. Type ls -l /boot/efi/efi/ubuntu. You should see two files, boot.efi and either grubia32.efi or grubx64.efi, depending on your platform. They should have the same file size; in fact, they’re identical.
  28. If both of those files are present, remove one of them; having both will just clutter your rEFInd menu unnecessarily. If you somehow wound up with just one file, though, leave it in place. If you don’t see either file, then do some troubleshooting now; you won’t be able to boot into Ubuntu without one of those files (or some other EFI boot loader for Linux).

At this point, if you did everything exactly correctly, you should be able to boot Ubuntu in EFI mode. When you reboot, your rEFInd menu should include a new Ubuntu option, as shown below. Select it and your GRUB menu should appear; it will resemble the one shown earlier, although it may use a different font and color scheme.
After installing an EFI version of GRUB, rEFInd should show you an
    Ubuntu option.

Once you’re satisfied with your ability to boot and use both Linux and OS X, you can delete the BIOS Boot Partition from your hard disk. It’s no longer needed, but OS X may want free space where it resides in the future. You can use GParted, parted, gdisk, or any other partitioning tool to delete this partition.

Although my own system doesn’t seem to suffer from its presence, it’s conceivable that some Macs will experience boot-time slowdowns because of the presence of the BIOS version of GRUB’s boot code in the hard disk’s MBR. If you think this is happening, you can type sudo dd if=/dev/zero of=/dev/sda bs=440 count=1 to eliminate it. Be very careful with that command, though! Be absolutely positivethat you’ve typed it correctly, and particularly the bs=440 and count=1 numbers. If you write too much data in this way, you can damage your partition table!

If you’ve not used it before, you may want to peruse the rEFInd documentation. Although the default options work well for most systems, you may want to tweak some of them or install ancillary programs, such as an EFI shell program.

You may want to add an entry for the ESP to your /etc/fstab file so that it will be mounted automatically whenever you boot. The following line will do the trick on most systems:

/dev/sda1     /boot/efi   vfat     ro,fmask=133    0 0

You can tweak this entry as you see fit. The /dev/sda1 specification works for most people, but you could change it to use a LABEL or UUID specification, as in UUID=2B68-9A85. This will make the configuration more robust should the disk identifier change because you boot with a different disk configuration or you repartition the disk. If you this change, you’ll need to obtain the label or UUID value for your ESP. Typing blkid /dev/sda1 (changing the device identifier, if necessary) should do this.


Fix Intermittent Wifi in Ubuntu 14.04 on 2013 Macbook Pro (Broadcom 4331)

UPDATE (5/7/2014): It turns out I continued to have connectivity issues, which were exacerbated when I downloaded a large file. After 60mb, it seemed to kill WiFi. I tried reloading the Broadcom drivers and various other things, but it wouldn’t work. Changing to the proprietary drivers under Software & Sources->Additional Drivers fixed the issue for me:

Screenshot from 2014-05-07 14:51:37

My Macbook Pro 13″ was having connectivity issues after the upgrade to 14.04 LTS. It would stay connected to the hotspot, but would not transmit data.

Issuing “$ sudo service network-manager restart” would temporarily resolve the issue, but it was getting annoying doing that every 10 minutes or so.

The fix:

  1. Run these commands:
  2. # modprobe -r b43 && modprobe b43
  3. The reboot.

WiFi should stay connected now.

Fix WiFi on Macbook Pro (Broadcom 4331) for Latest Kernel 3.11.0-19 (Ubuntu)

So, yesterday’s update to the latest kernel (3.11.0-19-generic) broke my Macbook Pro’s WiFi. Here’s how to quickly resolve the issue:

  1. Reboot into a previous Kernel, hopefully WiFi will work again.
  2. Then run these commands:
  3. $ sudo add-apt-repository ppa:mpodroid/mactel
    $ sudo apt-get update
    $ sudo apt-get install b43-fwcutter firmware-b43-installer
    $ wget http://www.lwfinger.com/b43-firmware/broadcom-wl-5.100.138.tar.bz2
    $ tar xf broadcom-wl-5.100.138.tar.bz2
    $ sudo b43-fwcutter -w "/lib/firmware" broadcom-wl-5.100.138/linux/wl_apsta.o
  4. Then reboot and you should be able to use the latest kernel with WiFi working once again.

Last Ditch Effort: Resolving Thunderbird’s Maximum IMAP Connections Exceeded

I tried a few different ways to fix Thunderbird’s Maximum IMAP Connections exceeded issue. The most common is to go into advanced settings and change the value from 5 to a lesser value.

I only have one IMAP account, so changing to three or one didn’t fix the issue. Final resolution? Deleting the account and remaking it.

Not really a solution, but time-wise, it was much faster than to continue researching how to fix this issue in my particular case.