Pandora FMS: Send Email Alert on Low Disk Space

To configure PandoraFMS to email you, if your disk space available falls below a certain threshold, follow these steps:

    1. Select the Agent and view its modules:Screenshot from 2014-11-19 22:18:04
    2. I want to be notified if Disk_/raid/media01 and Disk_/raid/media02 fall below 10%. So, click the wrench to see what the Warning and Critical conditions are set at:Screenshot from 2014-11-19 22:19:46
    3. My Warning status is set to Max 10 and Min 5, which means if Disk Space Available drops below 10%, it will be in the Warning status. It will get pushed to Critical if it drops below 5% and down to 0%.
    4. Now, I’m going to setup an email alert if it hits the Warning status.
    5. Go to Manage Alerts->Create Alert
    6. Fill in like the below to send an email at the Warning Status (or Critical):Screenshot from 2014-11-19 22:23:38
    7. And you’re done!

Pandora FMS: Create an Alert for a Non-Responding Agent (Monitor Downtime)

Assuming you’ve setup email alerts, one of the first things I wanted to monitor was if my agent was no longer updating.

To do this:

  1. On the left Nav bar, go to Administration->Manage Monitoring->Manage Agents.
  2. Find your agent, and click the link for Modules below the agent name.Agent
  3. At the top, press create (leave it on the default “Create a new data server module”Screenshot from 2014-11-19 21:53:20
  4. Most of this can be left at default settings, just call the module what you’d like (e.g. MyKeepAlive) and choose the Type as KeepAlive then press save.
  5. Now that we have a module to monitor the status of the agent, we can create an alert for it.
  6. Follow these steps and choose MyKeepAlive as the module name with a status of Critical and you’ll get an email when the agent is no longer updating.

NOTE: If you notice there will be a little yellow triangle stating it’s a non-initialised module. This is normal, refresh the screen and you should be good.

Pandora FMS: Setting Up Email Alerts

Mostly because of my stubborness in not reading the manual (RTFM…), it took a bit to figure out how to get emails working. I’m going to assume the Pandora host machine has postfix setup correctly, if not, follow this setup on Pandora’s documentation.

Overview

  1. Create an action
  2. Create an alert

Steps to Follow

Here’s the quick and dirty on getting email alerts setup:

  1. Go to Administration on the left Nav bar and click on Manage Alerts, then Actions.
  2. Then click Create on the right
    PandoraFMS Alerts 1
  3. Next, we need to configure out action:
    1. Create a name like Mail to Me
    2. Specify a group (or set it to all)
    3. Set command to eMail
    4. Command Preview = Internal Type
    5. Destination Address = your email address
    6. Subject = [PANDORA] Alert from agent _agent_ on module _module_PandoraFMS Alert Email 2
  4. After that we’ll need to go back to Manage Alerts and create a new Alert.PandoraFMS Alerts 4
  5. Choose the agent you want to apply the alert to.
  6. Select the module that you’d like to trigger the alert (e.g. Free Memory)
  7. Select Template (I chose Critical Condition)
  8. Actions = Choose your action you created above (Mail to Ryan).
  9. Number of Alerts to Match
    1. I set mine to 0 to 1 so that 0 being the first time it happens, it will trigger an alert, and will do so only once. You could set it at 10-20 which would be it needing to be critical 10 times before it triggers an alert then will do it for the next 10.
  10. Threshold of time before it triggers the alert.
  11. Press Add Alert and you’re done.

Testing the Alert

  1. Go to Agent Details and select your agent that you created an alert for.
  2. Scroll to the bottom and you should see something like this:PandoraFMS Alert5
  3. Press the green circle to force the alert to be sent.
  4. Check your inbox, and you should have something like this:Pandora EMail

Notes on Setting Up a Central Log Management Server (Logstash, Elasticsearch & Kibana)

REVISED on February 23, 2015 due to several minor changes with the new packages.

Overview of Setup:

Logstash Server:

Ubuntu 14.04 LTS with 4gb of RAM

Part 1 > Install OpenJDK

  1. Install OpenJDK
    $ sudo apt-get update 
    $ sudo apt-get install openjdk-7-jre-headless

Part 2 > Install Logstash (The Indexer)

This is on the log server side. It indexers the logs and pipes them into elasticsearch.

  1. Download Logstash & install the files
    wget https://download.elasticsearch.org/logstash/logstash/packages/debian/logstash_1.4.2-1-2c0f5a1_all.deb
    dpkg -i logstash_1.4.2-1-2c0f5a1_all.deb
  2. Generate SSL Certs
    mkdir -p /etc/pki/tls/certs
    mkdir /etc/pki/tls/private
  3. Add the host as a CA in the [v3_ca] section:
    nano /etc/ssl/openssl.cnf
    subjectAltName = IP:ipaddressofhost
    
  4. Next, generate the certificate and private key:
    cd /etc/pki/tls; sudo openssl req -x509 -nodes -days 3650 -newkey rsa:2048 -keyout private/logstash-forwarder.key -out certs/logstash-forwarder.crt
  5. Later, we’ll copy that key to each server that will be forwarding logs to logstash.
  6. Next, we’ll configure Logstash. Config files should be placed in /etc/logstash/conf.d/
  7. First, create an input config, we’ll name it 01-lumberjack-input.conf, which 01 will place it first in line to be read by logstash.
    nano /etc/logstash/conf.d/01-lumberjack-input.conf
  8. Place this in the lumberack input conf:
    input {
      lumberjack {
        port => 5000
        type => "logs"
        ssl_certificate => "/etc/pki/tls/certs/logstash-forwarder.crt"
        ssl_key => "/etc/pki/tls/private/logstash-forwarder.key"
      }
    }
  9. Next, let’s create a filter for syslog messages:
    nano /etc/logstash/conf.d/10-syslog.conf
    filter {
      if [type] == "syslog" {
        grok {
          match => { "message" => "%{SYSLOGTIMESTAMP:syslog_timestamp} %{SYSLOGHOST:syslog_hostname} %{DATA:syslog_program}(?:\[%{POSINT:syslog_pid}\])?: %{GREEDYDATA:syslog_message}" }
          add_field => [ "received_at", "%{@timestamp}" ]
          add_field => [ "received_from", "%{host}" ]
        }
        syslog_pri { }
        date {
          match => [ "syslog_timestamp", "MMM  d HH:mm:ss", "MMM dd HH:mm:ss" ]
        }
      }
    }
  10. Grok will parse the messages based on the above specifications which will make the logs structured and searchable inside Kibana.
  11. For the last component, we’ll create the lumberjack output config file:
    nano /etc/logstash/conf.d/30-lumberjack-output.conf
    output {
      elasticsearch { host => localhost }
      stdout { codec => rubydebug }
    }
  12. Additional filters need to be created for each type of log (e.g. Apache). You can created additional ones later, with a filename between 01 and 30 so that it’s sorted between the input and output configuration files.
  13. Restart logstash
    service logstash restart
  14. Disable logstash built in web frontend:
    service logstash-web stop
    update-rc.d -f logstash-web remove


Part 3 > Install Elasticsearch

  1. Download and install elasticsearch
    wget https://download.elasticsearch.org/elasticsearch/elasticsearch/elasticsearch-1.4.2.deb
    dpkg -i elasticsearch-1.4.2.deb
  2. Edit Elasticsearch config to allow Kibana to speak with it, add this at the end of /etc/elasticsearch/elasticsearch.yml
    http.cors.enabled: true
    http.cors.allow-origin: "/.*/"
    script.disable_dynamic: true
  3. Restart elasticsearch
    service elasticsearch restart

Part 4 > Install Kibana (Web Frontend)

  1. Download Kibana package, unpack and move to /var/www folder
    wget https://download.elasticsearch.org/kibana/kibana/kibana-3.1.2.tar.gz
    tar xvf kibana*
    mv kibana-3.1.2 /var/www/kibana
    
  2. Edit config.js in /var/www/kibana/ and replace port 9200 with 80:
     elasticsearch: "http://"+window.location.hostname+":80",
  3. Create a virtualhosts file for Kibana in Apache2 for /var/www/kibana

Part 5 > Install Logstash Forwarder

UPDATE: As of 2/16/2015, the deb repo was taken down. I need figure out the steps to compile from the master branch, since that seems to be the only way. Full discussion here.

UPDATE (02/23/2015): Here are the steps to compile from master. 

Do these steps on each server:

  1. Copy crt from Logstash server to each forwarding machine:
    scp /etc/pki/tls/certs/logstash-forwarder.crt username@remoteip:/tmp
  2. Compile from source:
    1.  Download from github the zip file: https://github.com/elasticsearch/logstash-forwarder
    2. Unzip and cd to the directory.
    3. Make sure you have the compiling tools, if not:
      1. apt-get install gccgo-go
    4. # go build
      # mkdir -p /opt/logstash-forwarder/bin/
    5. # mv logstash-forwarder-master /opt/logstash-forwarder/bin/logstash-forwarder
  3. Install the init script to get Logstash Forwarded to start on bootup:
    cd /etc/init.d/; sudo wget https://raw.github.com/elasticsearch/logstash-forwarder/master/logstash-forwarder.init -O logstash-forwarder
    sudo chmod +x logstash-forwarder
    sudo update-rc.d logstash-forwarder defaults
  4. Copy the certs over:
    mkdir -p /etc/pki/tls/certs
    cp /tmp/logstash-forwarder.crt /etc/pki/tls/certs/
  5. Create and edit the logstash forwarder config file:
    nano /etc/logstash-forwarder
    
    {
     "network": {
     "servers": [ "logstashserverip:5000" ],
     "timeout": 15,
     "ssl ca": "/etc/pki/tls/certs/logstash-forwarder.crt"
     },
     "files": [
     {
     "paths": [
     "/var/log/syslog",
     "/var/log/auth.log"
     ],
     "fields": { "type": "syslog" }
     }
     ]
    }
    
  6. Restart the service on each forwarding machine and check Kibana to see that they are successfully shipping their logs.
    service logstash-forwarder restart

Working Around LibreOffice Base’s DATE_SUB & DATE_ADD Limitation

Much to my surprise, LO Base can’t pass the DATE_SUB and DATE_ADD query unless you choose to “Run SQL Query Directly.” The problem with this is that a) you can no longer modify the query in Design View, and b) user input prompts no longer work (:prompt type items).

So, I came up with a messy workaround, which works using the SUBDATE function. It seems the problem with DATE_SUB( ‘2014-08-01’, INTERVAL 1 MONTH) is the “INTERVAL 1 MONTH” part. SUBDATE allows entering a number of days to subtract or the INTERVAL statement. Use the INTERVAL statement and it breaks, days = no problem.

Here’s my example to for a BETWEEN command to return the last day of last month and for the begin date, the first day 3 months ago:

	DATE_FORMAT(SUBDATE( DATE_FORMAT( MAKEDATE( :Yr, ( :Mon ) * 28 ), '%Y-%m-01' ),30*3), '%Y-%m-01') AS `Begin Date`,
 
	DATE_FORMAT(Last_Day(SUBDATE( DATE_FORMAT( MAKEDATE( :Yr, ( :Mon ) * 28 ), '%Y-%m-01' ),30)), '%Y-%m-%d') AS `End Date`, 

The above prompts the user to enter the year (:Yr, can be 14 or 2014) and the month (:Mon, enter number). 30 seemed like a safe number to subtract. It basically gets the rough date of the correct month, which is then reformatted to be the 1st of the month and end of the month.

For my use, this is part of a multiple query, meaning if I want to run the report for last month (September 2014 as of this writing), another query is using the :Yr and :Mon to create a BETWEEN statement that looks like:

BETWEEN {D '2014-09-01' } AND {D '2014-09-30' }

Then the second query, using the “hacked” subdate function, is returning results between 2014-06-01 and 2014-08-31.

Just to recap:

  • Query 1 prompts user for the month and year they want to run the report.
  • Query 1 takes that, turns it into a begin and end date for a BETWEEN statement and outputs that to something like `Current_Month_Column`
  • Query 2 automatically grabs the same input, pipes the input to create a begin date and and end date of the month prior to the month returned for Query 1.

Hopefully that will help others running into the same issue.

Fix Slow Boot Times on Macbook Using rEFInd (Ubuntu/Linux)

It was taking roughly 30s during a system startup before rEFInd would display. After that, it would take only 10s to boot into Ubuntu. I searched all over for an answer but until today, couldn’t figure it out. It’s because Ubuntu installs a Hybrid MBR, rather than using pure GPT and EFI.

The fix is pretty simple, a quick overview is:

  1. Recreate the partitions in OS X so that the Hybrid MBR is replaced.
  2. Reinstall rEFInd

The full instructions can be found by going to here on rEFInd’s documentation page. Follow those steps and rEFInd should now pull up in under 5 seconds.

Pasted from there:

Fixing the Installation

If you’ve followed the directions, your computer should now be booted into OS X, looking very much like it did before. Ubuntu is installed, however, and your disk has a hybrid MBR. You must now take steps to return the hybrid MBR to a safer protective MBR, as the GPT standard requires, and to set up a boot loader that enables you to select which OS to boot when the computer powers up. To do so, follow these steps:

  1. In OS X, launch a Terminal.
  2. Type sudo gdisk /dev/disk0 (changing the disk identifier as necessary). If at any point in the next few steps something seems wrong, type q to exit without saving your changes.
  3. In gdisk, type x. The command prompt will change to read Expert command (? for help):.
  4. In gdisk, type o. This command displays the contents of the hybrid MBR, which will probably consist of four partitions, one of which is of type 0xEE. The Ubuntu installer created a hybrid MBR (if one wasn’t already present) in an attempt to be helpful.
  5. In gdisk, type n. The program won’t seem to do anything; it will just show you another command prompt.
  6. In gdisk, type o again. The MBR contents should be different from before; there should just be one partition, of type 0xEE. This is a standards-compliant protective MBR.
    You can convert a hybrid MBR to a protective MBR with gdisk.
  7. In gdisk, type w to save your changes.
  8. Unpack the rEFInd zip file you downloaded earlier. If you downloaded the CD image, mount it.
  9. In the Terminal, change into the directory created by unpacking the rEFInd zip file, or to the CD image’s mount point.
  10. Type ./install.sh. This runs a script that installs rEFInd to your OS X boot partition and “blesses” the program so that the Mac will use it when you next boot. If you’re using whole-disk encryption on your OS X partition or if you want to install rEFInd to the ESP rather than to the OS X boot partition, type ./install.sh esp rather than ./install.sh.

    Update:If you’re using a 3.3.0 or later kernel, you can skip most of the rest of this page, and instead perform a much simpler operation:

    1. Copy an EFI driver for the filesystem you used on /boot (or your root filesystem, if you didn’t split off /boot) from the rEFInd package to the drivers subidrectory of the rEFInd installation directory, which is normally /EFI/refind. Note that you must copy the driver for your EFI’s architecture—architecture codes appear in the filesystem drivers’ filenames. If you did not use ext2/3/4fs or ReiserFS on /boot, this variant procedure will not work.
    2. When you reboot, highlight one of the Linux options that refers to a file called vmlinuz-version, where version is a version number.
    3. Press F2 or Insert twice to open a line editor.
    4. Add ro root=/dev/sda5 to the kernel options, changing /dev/sda5 to your root filesystem’s identifier.
    5. Press Enter. This should boot Linux, although the screen might go completely blank for a few seconds.
    6. If it doesn’t already exist, create a directory called /boot/efi.
    7. Edit /etc/fstab and add an entry to mount your ESP (normally) /dev/sda1 at /boot/efi. The entry should resemble the following:
      /dev/sda1     /boot/efi   vfat     ro,fmask=133    0 0
    8. Type mount -a to mount the ESP at /boot/efi.
    9. Run the mkrlconf.sh script that comes with rEFInd, as in sudo ./mkrlconf.sh, typed from the directory where the file exists. This action should create a file called/boot/refind_linux.conf, which is briefly described in the Improving the Boot Method section.

    At this point, it should be possible to boot Linux by rebooting the computer and selecting one of the vmlinuz-version entries in rEFInd’s menu. If this doesn’t work, continue with the main procedure described here….

  11. Load /efi/refind/refind.conf into a text editor and locate the commented-out scanfor line. (If you installed rEFInd to the ESP, you’ll need to mount the ESP and load the configuration file from there.) Uncomment the scanfor line by removing the leading hash mark (#) and then add a new item, cd, to the end of the line. It should read scanfor internal,external,optical,cd. (If you’re using USB flash drives, add biosexternal instead of or in addition to cd.)
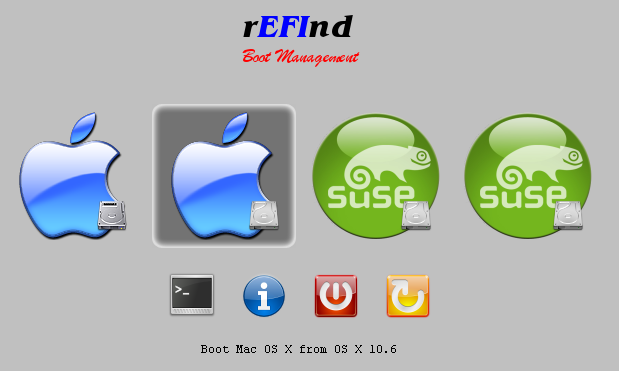
  12. Reboot. The rEFInd menu should appear, as shown below. Your menu options might differ from these, though. (This system has two OS X installations and a working OpenSUSE installation accessible via two entries.)
    rEFInd presents a graphical menu of OS choices each time you boot.
  13. Insert the Super GRUB 2 Disk into the computer’s DVD drive.
  14. Restart your Mac by selecting the reboot item (the yellow icon with the circular arrow on the far right of the row of smaller icons).
  15. When the rEFInd menu re-appears, you’ll see a new Linux icon on the far right of the display. (Depending on your screen’s size and the number of OS loaders rEFInd discovers, you may need to scroll over to see it.) Select it.
  16. After a while, a GRUB 2 menu should appear. Pick the Detect any GRUB 2 installation (even if MBR is overwritten) option from the menu. Note: On my system, if I leave this menu up for more than two or three seconds, it hangs at this point. If yours is the same, you’ll need to act quickly!
  17. A new menu should appear listing the GRUB 2 installations it could locate. On my system, this consisted of a grand total of one installation, identified as (hd1,gpt6)/grub/core.img, so there’s no ambiguity: Select it! (Of course, your disk device numbers are likely to differ from mine.)
  18. At this point, a normal Ubuntu GRUB 2 menu should appear, enabling you to boot Ubuntu as you would on a PC. (The screen may go completely black for part of the boot process. Don’t worry; this is normal.)
    The GRUB menu on a Mac typically includes Ubuntu, memory test, and
    OS X options.
  19. When the login screen appears, log into your Ubuntu installation.
  20. Click Dash Home (the icon in the upper-left corner of the screen) and type term in the search field. A few icons should appear, including one called Terminal. Click it to launch a Terminal program.
  21. Type sudo mkdir /boot/efi to create the standard mount point for the EFI System Partition (ESP).
  22. Type sudo mount /dev/sda1 /boot/efi to mount the ESP at /boot/efi. (Change /dev/sda1 if your ESP has an unusual partition number.) You can use gdisk to check the ESP’s number, if you like.
  23. Type ls /boot/efi. You should see the contents of the ESP, which will probably consist of a single directory called efi. There could be other files and directories, but probably not many of them. If it appears you’ve mounted the wrong partition, review your partition layout and the commands you’ve typed to mount the ESP. Proceed only when you’re sure you’ve mounted the ESP at /boot/efi.
  24. Type sudo apt-get install grub-efi. This replaces the BIOS version of GRUB that the Ubuntu installer installed with an EFI-based version of GRUB. In fact, there are two different EFI-enabled versions of GRUB: grub-efi-ia32 and grub-efi-amd64. Installing grub-efi installs the package that’s appropriate for your system, assuming you installed the optimum architecture. If you’re running a 32-bit version of Ubuntu on a recent 64-bit OS X firmware, you may need to explicitly install grub-efi-amd64. Installing grub-efi also installs a number of dependencies, such as efibootmgr
  25. Type sudo mkdir /boot/efi/efi/ubuntu/. This command creates a home for GRUB on the ESP. (Note the doubled-up efi in the path. This is not a typo.)
  26. Type sudo grub-install. (Recent versions of GRUB seem to require an option. Pass it your ESP’s device filename, as in sudo grub-install /dev/sda1.) You’ll see a few messages appear on the screen, including a couple of “fatal” errors about EFI variables. Ignore those messages. They’re caused by the fact that you’re booted in BIOS mode, and they’re irrelevant because the task they’re intended to perform will be handled by rEFInd.
  27. Type ls -l /boot/efi/efi/ubuntu. You should see two files, boot.efi and either grubia32.efi or grubx64.efi, depending on your platform. They should have the same file size; in fact, they’re identical.
  28. If both of those files are present, remove one of them; having both will just clutter your rEFInd menu unnecessarily. If you somehow wound up with just one file, though, leave it in place. If you don’t see either file, then do some troubleshooting now; you won’t be able to boot into Ubuntu without one of those files (or some other EFI boot loader for Linux).

At this point, if you did everything exactly correctly, you should be able to boot Ubuntu in EFI mode. When you reboot, your rEFInd menu should include a new Ubuntu option, as shown below. Select it and your GRUB menu should appear; it will resemble the one shown earlier, although it may use a different font and color scheme.
After installing an EFI version of GRUB, rEFInd should show you an
    Ubuntu option.

Once you’re satisfied with your ability to boot and use both Linux and OS X, you can delete the BIOS Boot Partition from your hard disk. It’s no longer needed, but OS X may want free space where it resides in the future. You can use GParted, parted, gdisk, or any other partitioning tool to delete this partition.

Although my own system doesn’t seem to suffer from its presence, it’s conceivable that some Macs will experience boot-time slowdowns because of the presence of the BIOS version of GRUB’s boot code in the hard disk’s MBR. If you think this is happening, you can type sudo dd if=/dev/zero of=/dev/sda bs=440 count=1 to eliminate it. Be very careful with that command, though! Be absolutely positivethat you’ve typed it correctly, and particularly the bs=440 and count=1 numbers. If you write too much data in this way, you can damage your partition table!

If you’ve not used it before, you may want to peruse the rEFInd documentation. Although the default options work well for most systems, you may want to tweak some of them or install ancillary programs, such as an EFI shell program.

You may want to add an entry for the ESP to your /etc/fstab file so that it will be mounted automatically whenever you boot. The following line will do the trick on most systems:

/dev/sda1     /boot/efi   vfat     ro,fmask=133    0 0

You can tweak this entry as you see fit. The /dev/sda1 specification works for most people, but you could change it to use a LABEL or UUID specification, as in UUID=2B68-9A85. This will make the configuration more robust should the disk identifier change because you boot with a different disk configuration or you repartition the disk. If you this change, you’ll need to obtain the label or UUID value for your ESP. Typing blkid /dev/sda1 (changing the device identifier, if necessary) should do this.


Fix Intermittent Wifi in Ubuntu 14.04 on 2013 Macbook Pro (Broadcom 4331)

UPDATE (5/7/2014): It turns out I continued to have connectivity issues, which were exacerbated when I downloaded a large file. After 60mb, it seemed to kill WiFi. I tried reloading the Broadcom drivers and various other things, but it wouldn’t work. Changing to the proprietary drivers under Software & Sources->Additional Drivers fixed the issue for me:

Screenshot from 2014-05-07 14:51:37

My Macbook Pro 13″ was having connectivity issues after the upgrade to 14.04 LTS. It would stay connected to the hotspot, but would not transmit data.

Issuing “$ sudo service network-manager restart” would temporarily resolve the issue, but it was getting annoying doing that every 10 minutes or so.

The fix:

  1. Run these commands:
  2. # modprobe -r b43 && modprobe b43
  3. The reboot.

WiFi should stay connected now.

Fix WiFi on Macbook Pro (Broadcom 4331) for Latest Kernel 3.11.0-19 (Ubuntu)

So, yesterday’s update to the latest kernel (3.11.0-19-generic) broke my Macbook Pro’s WiFi. Here’s how to quickly resolve the issue:

  1. Reboot into a previous Kernel, hopefully WiFi will work again.
  2. Then run these commands:
  3. $ sudo add-apt-repository ppa:mpodroid/mactel
    $ sudo apt-get update
    $ sudo apt-get install b43-fwcutter firmware-b43-installer
    $ wget http://www.lwfinger.com/b43-firmware/broadcom-wl-5.100.138.tar.bz2
    $ tar xf broadcom-wl-5.100.138.tar.bz2
    $ sudo b43-fwcutter -w "/lib/firmware" broadcom-wl-5.100.138/linux/wl_apsta.o
  4. Then reboot and you should be able to use the latest kernel with WiFi working once again.